Build your own set-top box pt 3
written by smashing
 Previously we got our set top box to its first boot into the BIOS screen. This time we dig deeper, add a hard drive and install the box’s first operating system. By the end of today’s installment you’ll be surfing the Internet and browsing websites on your soon-to-be set-top box.
Putting together hardware is all about having confidence at each stage that things are working up to that point. Booting into the BIOS was an important step and confidence builder. It proved that the power supplies, memory and motherboard are all working.
The next step is to hook up a keyboard, and check you can navigate around the BIOS using the arrow keys on the keyboard.
It’s a good idea at this point to learn how to change things within the BIOS and what some of the BIOS settings are. A quick reminder… The BIOS is the very basic software that comes ‘burned in’ to the motherboard and which automatically runs each time you power up the motherboard. You can’t do very much with it but you can change a few settings. You will need to have familiarity with some of these settings later. Start by setting the time and date and explore other options from there.
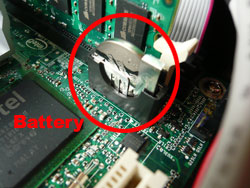
Don’t worry too much about what you change in the BIOS. Normally you have to select ‘yes’ on a ‘save settings’ page to actually make the changes permanent. If all else fails you can simply power down, unplug, and remove the small battery on the motherboard for 10 minutes. This will reset everything back to factory fresh. Just remember which way round the battery comes out, and remember to put it back in again.
Incidentally now is a good time to experiment with the power switch – how long you have to press it to shut down, turn it on, etc. This understanding of the subtleties will help you later on.
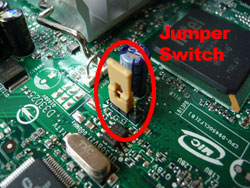
If you’ve been following on from the last article, now is the time to try switching out of ‘configuration mode’ and into ‘normal mode’ using the small jumper switch on the motherboard. That done you can check whether you are able to boot into BIOS using the F2 key on the keyboard. This is the normal method of accessing the BIOS. Simply switch on and hold down the F2 key on the keyboard until you get to the BIOS screen.
How computers normally work is that once you power up the motherboard, it loads the BIOS software, looks at what settings there are and then proceeds to load the operating system. Right now you won’t be able to go beyond the BIOS screens because you haven’t yet installed an operating system. But we’re about to change that.
We’ll be using Ubuntu, a surprisingly friendly Linux operating system for our tests. We start by booting into Ubuntu off a USB stick.
Almost all motherboards these days can boot up from a USB stick. If you have a correctly configured USB stick that contains an operating system (eg Ubuntu), you can boot into Ubuntu without the need for a hard drive or CD/DVD drive.
The basic steps are…
- Find a spare USB stick that is 1GB or higher
- Download the netbook version of Ubuntu (recommended) on another computer and follow the instructions* on the Ubuntu website on how to transfer it to a USB stick
- You can then boot up your set-top box in Ubuntu from the USB stick
* Ignore any suggestions on the Ubuntu website to check the ‘MD5 hash’.
The steps in more detail…
Your USB stick will need to be formatted as FAT32. Formatting is the type of filing system the stick uses. Your USB stick should already be formatted as FAT32 – most are. You can check (on Windows) by going into ‘My Computer’, right click on the USB ‘Removable’ drive and select ‘Properties’. Look for where it says ‘File System’ and with luck it will say FAT32. On a Mac you can check by ctrl-clicking on the USB disk icon and choosing ‘Get Info’.
If it says something other than FAT32 such as NTFS or FAT16 you will need to reformat your USB stick into FAT32. It’s not hard, simply follow these instructions for Windows and these instructions for Mac.
Having checked and/or formatted your USB stick and downloaded the Ubuntu IMG file, you can now follow the instructions on the Ubuntu website to copy the IMG file to the drive. Copying Ubuntu to the USB stick takes time and on the Mac it seemed like nothing was happening for a while, but it was.
UPDATE: Ubuntu is no longer distributed as an IMG file but as an ISO file (easy to burn to CD, less easy for USB). The new ‘wizard’ instructions from Ubuntu for installing to USB (via Ubuntu) did not work for me. The PC instructions which use the Pendrive Universal Installer worked well, and even worked under Parallels emulation on my Mac. One more important tip if you have boot problems from USB (a horrible “Boot Error” message)… Within the BIOS is a setting called “USB Mass Storage Emulation Type”. Change this from ‘Auto’ to ‘All Fixed Disc’. This problem had me stumped for hours.
Once you’re satisfied the USB stick is ready, eject it, and plug it into your set-top box. Connect a keyboard and mouse and turn it on. Hopefully you will go flying past the BIOS screen and straight into a welcome screen from Ubuntu.
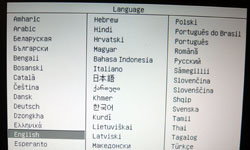
You may get a ‘choose language’ screen first. A problem that happened for me is that the USB stick I used first of all simply would not boot no matter what I tried. Some USB sticks have this problem and it is worth trying a different one if you are running into trouble. Cheap ‘conference’ USB sticks are to be avoided.
If you don’t get to the Ubuntu welcome screen and instead you get no further than the BIOS screen, there are two other things you can try.
a) Switch your configuration jumper switch back to normal mode if you haven’t already done so
b) Enable the BIOS setting that allows you to boot from a USB drive and any setting for ‘Boot USB Devices First’. Sometimes these are not enabled by default. Hopefully your earlier exploration of the BIOS screens will have revealed where these settings are and if all else fails read the motherboard manual for instructions on booting from USB.
Am going to skip through bits more quickly now as there’s lots of ground to cover…
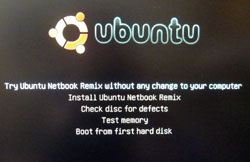
With luck you will now be looking at the Ubuntu welcome screen. You should have options about how to proceed including one for trying Ubuntu without making changes to your computer. This is the one to go with. There may be other options such as testing memory and disks but ignore these for now.
UPDATE: The screenshots show the older version of Ubuntu from what is available now.
Quick Aside – I’ve chosen Ubuntu as the test operating system but there are actually many flavours of Linux you could use. Ubuntu is just very user friendly. You could also use Windows of course, and if you really want to get experimental you can install Mac OS on PC hardware. It’s likely that we’ll settle on some flavour of Linux to run the set-top box in future, so Ubuntu is a good place to start.
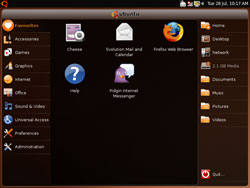
If you’ve been following along you should now be booting into the Ubuntu desktop and be greeted by a screen looking remarkably like a Windows or Mac desktop. Ubuntu is a full GUI operating system and comes with various applications pre-installed including the Firefox web browser. ‘Clicking’ is a little different in Ubuntu from what you might be used to. Often just one click is needed rather than two. Other than that it will seem very familiar.
Providing you can move the mouse around and click things you’ve also reached another milestone. Your mouse is working.
Now for another milestone. Plug in an ethernet cable, see if Ubuntu finds it (this might take a few seconds) and see if you can browse the Internet. If so, pat yourself on the back – you’ve built a fully functioning computer!
It would only be human to go exploring some of the features of Ubuntu at this point. By all means do so and come back…
Adding a Hard Drive
The final part of today’s installment is to plug in a hard drive and copy (install) the operating system from the USB stick to the hard drive. While the box will work perfectly fine off a USB stick, and we may end up using a USB stick in the final product, there will be lots of software installs to do between now and then and this will be much easier and much faster with a hard drive.
Full instructions follow…
N.B. Be careful to turn off the computer before installing the hard drive.
For the purposes of following along I’ll assume you are using a traditional hard drive at this point. You can use a spare laptop drive or a desktop drive (although it may not fit physically into your box), whatever you have lying around. The contents will be completely erased, so bear this in mind before proceeding. If you need to buy a hard drive I suggest getting the cheapest SATA laptop drive you can find – size (in GB) is not an issue. If money is less of an object, get a small SSD drive for super fast startup times.
Most current motherboards including the Little Falls 2 are very flexible and come with both SATA and older style IDE connectors for connecting hard drives. Whatever you have lying around should thus work.
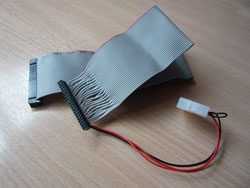
Be aware that if you are using an older (IDE) laptop drive you may need a cable that converts from a 2.5 inch IDE connector to a 3.5 inch IDE connector (pictured). Maplin sell these cheaply in the UK, CompUSA in the US. A small power connector for powering the hard drive is included.
If you are using a SATA drive, regardless of whether it’s a laptop drive or a desktop drive, you will have two connectors to hook up – a power cable and a data cable. The Little Falls 2 comes with both of these cables in the box as do most motherboards.
If you are using an IDE drive, you should check whether it is set as a ‘master’ device or a ‘slave’ device. Nearly always it is set as a master device and that’s what you want. Read here for more info on this.
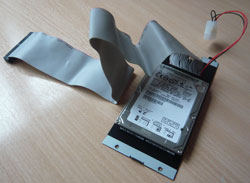
Don’t worry about installing the hard drive physically into the box at this point. Rest it anywhere it won’t get knocked or damaged.
A ‘being careful’ step now would be to boot into the BIOS and look for evidence of the hard drive being visible to the BIOS, and thus connected correctly and working. You should be able to see your hard drive listed in the ‘Boot Order’ section of the BIOS. If this scares you, just carry on, but you may need to change this setting later.
Now boot up off the USB stick again as before and select the option to install Ubuntu. The difference now is you will be using the USB stick to install a copy of Ubuntu to the hard drive rather than run from the USB stick. After a short delay you will be presented with a series of screens – language for install (this erroneously referred to a CD install rather than USB install), timezone, keyboard layout etc. The ‘Prepare Disk Space’ screen should show the newly connected hard drive as an option for where to install Ubuntu and you may need to reformat/partition the drive before doing so. Ubuntu gives you choices for this. If you get an option for single or multiple partition choose single. Make suitable choices for naming the computer and begin the install. It took about 10 minutes on my machine for the install.
At the end you should restart the computer, swiftly remove the USB stick and watch your set-top box boot into Ubuntu from the hard drive. If it gets stuck at the BIOS screen or gives you a message saying it can’t find an Operating System, you may need to go into the BIOS and set up the ‘Boot Order’ so that it tries to boot from the Hard Drive. Switch it off and try again.
If it’s worked, congratulations! You’re all ready for the next installment.
Read Pt 4: Installing Flash, getting it working on a TV, testing video performance