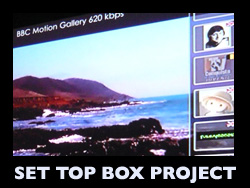
Build your own set-top box pt 4
written by smashing
 In the last part we fitted the hard drive and installed our first operating system – Ubuntu. Today we install Flash, check the performance of Flash video playback and hook the box up to a TV for the first time.
To install Flash on Ubuntu you will need to enter some commands into the Terminal window. If this frightens you, don’t worry, I’ll make it super easy and painless.
To get to the Terminal window, click on Accessories, then on Terminal. You will end up with a flashing cursor just to the right of a $ sign.
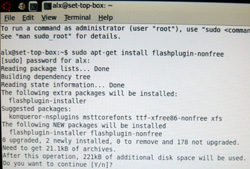
Now type the following carefully including all spaces and hit enter…
sudo apt-get install flashplugin-nonfree
You will be prompted for your password which is the password you set up when you installed Ubuntu (previous article). A confirmation prompt will appear and you should hit y for yes, then enter.
A flurry of text will scroll by and at the end it will say ‘Flash Plugin installed’ or words to that effect, and return you to a flashing cursor. Job done.
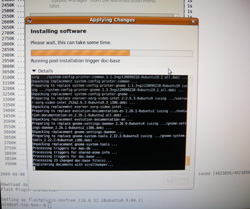
At this point you might get a window called Update Manager appear. It might appear anytime in fact – it’s hard to predict. This is similar to Windows Update and is a way for all the various bits of system software to update themselves to the latest version. There could be many updates to install and it’s probably worthwhile getting them out of the way now. It only took 10 minutes on my system to download and install all of the updates and I didn’t run into any problems, although the screen did seem to hang for a couple of minutes on one particular update. At the end you’ll be prompted to restart.
As an aside, on my box it took 55 seconds to startup at this point (following restart), a reasonable performance for a full operating system but not lightning quick. I was using a 7200 rpm laptop drive which is speedier than most, but no faster than say a desktop hard drive. Later in the series we’ll be slimming down the operating system to make it start up faster and testing other disk options including super fast Solid State Drives. For me, a fast start-up time is crucial for what is intended to be a home consumer device.
With all the updates installed and Flash installed we can now test the performance of Flash video which will of course be the heartbeat of our system. Nearly all online video sites use Flash video, so Flash performance is of critical interest to us.

Open up Firefox and and point your browser to worldtv.com/wtvpromohd where you can go through a series of increasingly higher quality Flash video clips. I’ve labeled each clip with its bitrate – the amount of data in kilobits-per second that is being transferred.
One factor with bitrate is how fast your broadband connection is (I’m assuming you have a fast enough connection to watch these videos) but a more relevant factor is the implication for how hard your set-top-box processor will need to work to decode the video and play it back on the screen. The higher the bit-rate the harder the processor will need to work. If it isn’t up to the job, it will start skipping frames.
So the thing to look for while watching the videos is not the picture quality (which will get better with increasingly higher bitrates) but the frame-rate, in other words how jerky the video is.
To give you a benchmark… eyeballing it, I figured I was getting the following frame rates…
| 620kbps BBC clip | 15 fps |
| 1000kbps King Lines | 12 fps |
| 2000kbps Cloverfield | 5 fps |
For me, really only the BBC and King Lines clips were watchable. By way of comparison normal TV is 25-30 fps.
Not to worry. This is only a first test and we’ll speed up the performance with some tweaks and tricks.
UPDATE: The clips referenced above may no longer be the first clips at the test URL. Newer clips using more efficient H.264 compression and some YouTube HD clips may appear first.
Incidentally the test URL has an animated Flash based EPG (electronic program guide) when you move your cursor to the left or right of the screen. Scrolling through the EPG is another way to test the performance of your box. If the scrolling feels unresponsive and slow then it means the processor is definitely maxed out.
The first thing you can do to improve the performance is to change the display resolution. To do this you go back to the desktop, click on ‘Preferences’, then ‘Display’. The resolution is shown in pixels – mine was a rather strange 1152 x 864 with a refresh rate of 60hz.
I changed it to 800 x 600 and tried to watch the test videos again. It immediately made a significant improvement, around 40-50% better on the BBC clip, 25% on the rock climbing clip and a minor improvement with the Cloverfield clip. Since s-video and composite video are lower than this resolution, we actually don’t lose anything by bringing it down to this level.
Technical aside – Processors and Flash
Flash video is truly brilliant as it has single handedly empowered the current era of web video. For years a nasty mix of video plugins and 3 competing technologies meant web video had little chance of achieving mainstream appeal. Remember Real Player? Quicktime? Windows Media Player? Flash video came out, YouTube built its website… and the rest is history.
While Flash video’s ubiquity is its strength – 99% of us have it installed – it is also its weakness. Flash works on all operating systems and all types of computers and achieves this feat by using the computer’s main processor to do the heavy lifting, rather than a dedicated and much more capable graphics chip. The is a simple approach for Adobe to take as graphics chip technologies vary significantly between computers, creating a huge headache to do it any other way.
Adobe are keen to have a crack at the alternative though and recent announcements shows they are working with graphics chip manufacturers to make Flash ‘hardware accelerated’. This may benefit those building set-top-boxes in future, but for now, we have to do our best to get the most out of our little Atom processor.
 Hooking up a TV
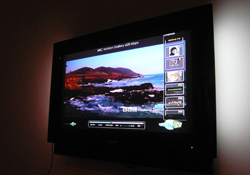
It’s now time to hook up our set-top box to a TV set. I’ll be doing this through the S-Video connector that comes fitted on the Little Falls 2, but you can also try an adapter that lets you use the more common RCA connector found on many TV’s. This is not without its complications, and I’ve written extensive notes on this in a forum posting.
I have a TV which can switch between the American NTSC standard and the European PAL format, otherwise known as a multi-sync TV. The Intel Little Falls 2 uses NTSC as its output, and it worked right away for me. Other people may not be so lucky, and again I would suggest visiting the same forum post for more details. Basically if you have an older PAL TV, you may only get output in black and white.
The problems you may run into are…
- An NTSC / PAL problem. As stated above, you will end up with a black and white picture if you have an older PAL only TV
- Using the wrong S-Video to RCA adapter. There is a confusing array of standards for S-Video connectors and some adapters will result in a black and white picture for completely different reasons than the PAL/NTSC issue above. Read my forum posting for more details including a connections diagram for those handy with a soldering iron or multi-meter
- A software issue. If you have a ‘rolling screen problem’, this can almost certainly be fixed with a software update. I had this problem myself and have provided instructions below
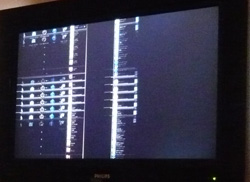 Fixing the S-Video output on the Little Falls 2
Randomly scrolling and unwatchable video is not really what we want from our set-top box. It has to do with the X windows software that Ubuntu builds its graphical user interface on and there’s an update (at the time of writing) to the software that fixes the rolling screen issue. It’s a bit of a pain but here goes…
Visit this page and click the ‘Read about installing’ link. You will be presented with detailed, well written instructions which guide you through the process of updating software from what’s called a ‘Personal Package Archive’. Basically this is where you tell Ubuntu about additional update locations that Ubuntu needs to check when the Update Manager runs. There’s an annoying step to do with PGP keys that is a little hairy, but if you read the instructions carefully, use copy and paste for the Terminal command line instructions, you should be ok. Incidentally the information you need which is referred to by the instructions is on the page underneath the pop-up instructions.
At the end, go to your Ubuntu desktop, click on ‘Administration’ and then ‘Update Manager’. You will see new updates ready to install, including the new video drivers. Install all of them, reboot and you should have Ubuntu on your TV – no rolling screen. Job done.
Sit back and watch!
Now’s a good time to take another look at the HD Test Channel, sit back in your sofa and enjoy the fruits of your labour. You’ve successfully built a set-top box and can experience the future of web based TV delivered over the Internet. That EPG on the right? It’s a gateway to 170,000 web based TV channels on WorldTV.com. Tell that to any person showing off their 1000 channel satellite system!
There’s still much more work to be done – this is a research project (for me) after all. We’ve not yet installed a Wi-Fi card, we’ve not talked about a remote control yet, and the operating system software and video performance still leave a lot to be desired.
But for me, watching as I did from my sofa, the quality was very nearly where I’d hoped it would be at this stage. The King Lines test clip for example is bang in the ballpark of my original goal of 720p equivalent Flash video and while the frame rate could be higher and the EPG more responsive, for a first time build this is very encouraging indeed.
At this stage you may decide to veer off on your own and if so I’d hope you pop back once in a while and contribute anything you’ve found. For my part, I plan to keep going and delve into the murky and competitive world of media centre software – including XBMC, Boxee and MythTV, and/or working to create my own web based set-top-box UI and a slimmer custom Linux operating system.
Thanks for reading… and good luck!
Alx, for your remote control for this project, you may want to consider the Loop pointer remote control – an in-air mouse for TVs (and for PCs connected to TVs). It will make navigating WorldTV a fun experience.
Hey.
I’m building 2 out of some really old laptops
BUT – They don’t have an S-Video connector
Any suggestions?
Hey how about remote control?
Once again, especially not here to run the DVR software or another – so I ended up going through a free programs, like those that you need to buy and compare the features and functions of each. There are many others out there, but what is in the text that I installed it by themselves or the client.