 If like me you have spent hours trying to find a simple and free FLV file converter, then you’ve probably pulled out most of your hair already.
The Internet is littered with products that claim to convert FLV files for free, but invariably come with nasty surprises attached, or insist you pay up for something that you probably feel you shouldn’t. Why can’t there be a simple free FLV converter?
Well there is, and I’m going to show you how to use it. You’ll also learn some neat stuff along the way…
FLV Conversion using FFmpeg
FFmpeg is the Swiss army knife of video and audio conversion tools. It is a rock solid open source product (albeit of dubious legality – more on this in a moment) that programmers all over the world turn to religiously in droves, and which is included in many other software programs as the ‘tool that does the conversion bit’. It comes with a big gotcha however… it is a command line tool that on first glance seems like something only propeller heads can use.
Well fear not FLV fans, I’m going to show you how to make using FFmpeg ridiculously easy. First I’m going to explain quickly why FFmpeg is really the only option available.
Why aren’t there free GUI based FLV Converters?
The reason there are no free graphical based FLV converters out there (and for that matter video converters in general), is because of patent and licensing issues. For someone to offer a converter means they have to buy the rights to do so (which is never cheap), and that means nobody apart from a very generous philanthropist could offer such a product for free.
As a result, you have a situation where many dodgy (non paying) developers put out sketchy GUI converters and try to stay ‘below the radar’, putting their converters up on shareware / freeware sites and offering versions with watermarks and other gotchas that entice you to pay.
So what’s the deal with FFmpeg?
FFmpeg also tries to stay below the radar by being open source and basically NOT OFFERING AN EASY INSTALLER OR INTERFACE. If they did, they would raise the ire of many big companies. FFmpeg converts dozens of patented file formats and codecs and by keeping its use to propeller heads, they steer clear of reaching a size that could make them a target.
So where does this leave me?
FFmpeg, while intimidating at first glance, is far and away the best option if you are looking for a guaranteed reliable, high quality and 100% free solution to converting not just FLV files, but any video or audio file format you might want. With this guide, even a command line virgin (as I was) will be converting FLV files in no time. And you won’t have to deal with sketchy shareware software that won’t be there the next time you look for it. This guide should stand the test of time.
So stay with me and follow my easy guide!
Finding FFmpeg for Windows
First things first, you need to get yourself a copy of FFmpeg for Windows that does not require compiling or other complex nonsense. This isn’t exactly easy but I’ve made it easier…
Option 1 – Easy option
Download my ridiculously easy to use Windows FFmpeg pack in convenient ZIP format, and keep this browser open for the remainder of the tutorial.
Option 2 – More complex but may be a newer version
For the very latest Windows version of FFmpeg, you will want to check out this site. You may have to decompress a tricky tar.bz2 file to get at the ffmpeg.exe file it contains. The site is maintained by an enthusiast who regularly compiles a Windows version from the latest source files.
Installing and Using FFmpeg on Windows
Whichever route you take, you should end up with a file called ffmpeg.exe. Yours may not show the .exe extension if your computer is set to ‘hide extensions for known file types’ (a default setting in Windows XP).
If you are running ahead of me, you will probably already have discovered that nothing happens if you try to double click ffmpeg.exe. Perhaps more worrying is that something does appear to happen but then… nothing. Fear not, all is how it is supposed to be.
Stay with me…
FFmpeg is a command-line tool meaning it should only be ‘invoked’ (that’s ‘started’) from the command line.
Ridiculously Easy Guide to the Command Line
From the ‘Start’ menu, choose ‘All Programs’ and then ‘Accessories’ and then ‘Command Prompt’. You should now have a screen that looks like this…
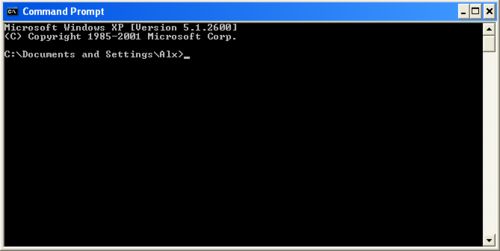
The way to think about this screen is that it is ‘sitting’ in a specific location on your computer. Any commands you type into it will apply only to that location. This will become clear in a second.
You can tell which location it is in by looking at the text which says (in my case) C:\Documents and Settings\Alx. Yours will have your name at the end or the owner of the computer.
So the command prompt is ‘sitting’ in the C drive of your computer, within the Documents and Settings folder, and within (in my case) the Alx folder. Another word to describe this is your ‘home’ folder (or home directory).
Now go to this folder yourself using ‘the GUI way’. Double click My Computer, double click the C drive, double click Documents and Settings, and then double click your name.
Looking within this folder you will see a folder for your Desktop and the ‘real’ location of your My Documents folder. Peek inside your My Documents folder to see all your files.
Now you are going to type your very first command line instruction, and officially become a true geek of propeller head proportions. If you do not wish to become a geek, do not do this step, and go off looking again for more shareware nightmares.
Using the command line, enter the word ‘dir’ without the single quotes where the cursor is flashing patiently. Then hit enter.
A bunch of text will now appear which should look something like this…
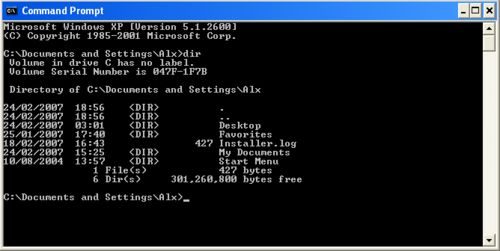
What you have just done is generated a text based list of everything in your home directory. You will see this is the same set of items as when you view the folder the ‘other way’. In other words, your Desktop folder, My Documents folder are all there. There’s also some additional info such as how much disk space you have remaining which in my case is a rather measly 301 megabytes. I really need to clear some files…
Now this is where things get fun…
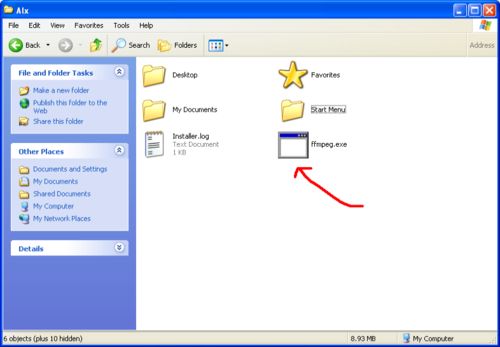
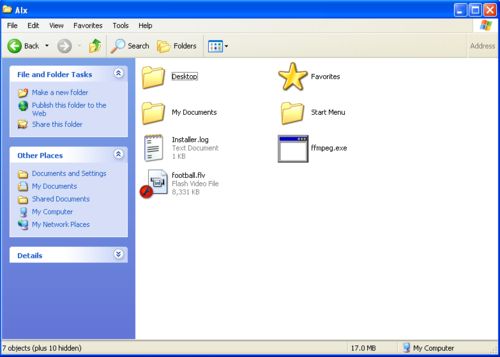
You should now be looking at two very different views of your home directory – the command line way and the GUI way. Using the normal GUI way of doing things, move the ffmpeg.exe file which you downloaded, into your home folder. Your home directory should now look something like this…
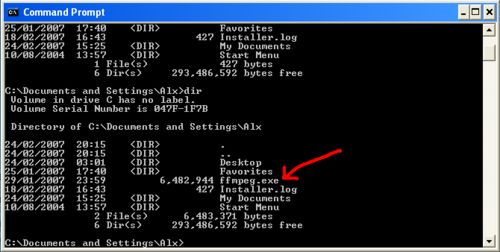
If you’re the adventurous type you may already have tried typing ‘dir’ into the command prompt to see if the ffmpeg.exe file has appeared there too. If not, do so now…
Now you might be thinking at this point that this is a lot of work. It is, but you’ll only have to do this once.
Getting jiggy with FFmpeg at last
So a quick recap. By now you should have a copy of ffmpeg.exe sitting in your home folder. We’ve put it there because it makes using its command line interface much easier.
Now we are going to convert an FLV file to a WMV file.
Grab an FLV file from somewhere and put it in your home directory. Let’s say the FLV file is called football.flv. Your home directory should look something like this…
To convert to WMV all you need to do is the following…
Using the command prompt type…
ffmpeg -i football.flv football.wmv
Note those are spaces between the ffmpeg and the -i, the -i and football.flv, and the football.flv and football.wmv.
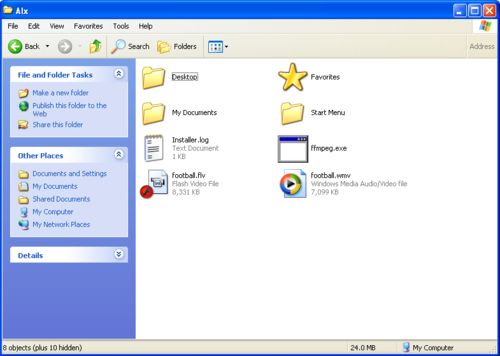
The command line will kick into action, showing the progress of the conversion, and at the end you should have a WMV file in your home directory
That wasn’t too hard was it?!
Translating into english, what you have just done is to say…
“Using a program called ffmpeg in the current location, take the input file football.flv (in the current location), and turn it into football.wmv (in the current location).”
Note that if we had not put everything into the home folder (the current location), the instruction would have been much more complicated. Note also that your filenames (input or output) should not have spaces in them – footballplayer.flv is fine, football player.flv is not.
If you wanted to convert an FLV file to AVI format you would simply type…
ffmpeg -i football.flv football.avi
To convert a MPG file to FLV you would type…
ffmpeg -i football.mpg football.flv
You may run into audio problems converting into FLV files if the source file is not one of three set audio sample rates. If you experience this problem include an extra command which specifies the output sample rate as follows…
ffmpeg -i football.mpg -ar 22050 football.flv
As far as command line programs go, ffmpeg couldn’t be simpler. Just remember to always put your ‘input’ files into the home directory before trying to convert. The output files will also end up in your home directory.
One final note. You may find (as I did) that avi output failed to produce a file that Windows Media Player had the right codec for. In this case, the easiest thing is to stick with WMV. Pretty much anything that can open AVI can open WMV. FFmpeg can deal with codec conversion without drawing breath, but you will need to learn much more about the program and its commands. Pretty much anything is possible – you can change codecs, bitrates, size of video and all kinds of other stuff. Full FFmpeg documentation can be found here.
**UPDATED MAY 2008** – If you’ve liked this tutorial, you will probably be very interested in WorldTV.com, a service I’ve been working on for a (very) long time which has just recently launched. You can create your own full screen, high-definition capable, online TV channel using videos pulled from YouTube, Metacafe etc and even FLV files hosted on your own server. It’s a playlisting service for FLV files basically that is designed to be super easy to use. You can search for clips to add to your channel and once added you can download the FLV files to your desktop by right-clicking on them. You can embed your channel in your own website and add your own FLV files to your channel – this is how you can get HD quality. For more on HD flash video see this other article of mine. The service is 100% free, as in beer, and I encourage you to check it out at the WorldTV homepage.
**UPDATED DEC 2008** – Following a couple of comments where people were having problems converting the latest codecs, I’ve updated my easy FFmpeg pack with the most current version of FFmpeg. I’ve not had the opportunity to test this so please let me know by way of comments if it works for you. Download the new 2009 version here.
**UPDATED June 2009** – Due to the many thankful comments for this and my other popular posts – with people offering me their first born, a dozen cookies, among others (!), I’ve now added a donation page. If this article has helped you, help me!
Mac Users
I’m a Mac user myself but I did not readily find pre-compiled Mac versions of FFmpeg. For the truly fearless you can compile your own using this tutorial here. If you know of a reliable source please let me know through the comment section and I will add it to the tutorial. Other helpful tips and comments are also welcome since they will assist others trying to find their way. TIA.
Have you ever tried SUPER from eRightSoft?
It’s freeware and works perfectly!
http://www.erightsoft.com/Superdc.html
FROM THE AUTHOR
No, but thanks for the heads up. The UI looks a little overkill for most people, but if it does what it says on the tin, it may be an option for people who are looking for a freeware GUI to FFmpeg. Anyone’s experience with this software would be welcomed until such time as I can put it through its paces myself.
Thanks for a useful contribution.
i think this good software
I didn’t really read much about super and I don’t know if it provides commandline (for batch/backend) conversions. FFMPEG however does provide that option and here are a few links I gathered for that purpose:
http://luar.com.hk/blog/?p=670
(EDITED)
Great Post!
I FLV converter is my website, It provides all popular FLV converters including FLV encoder, decoder and player. all your comments are welcomed.
This is a very nice little piece of software. I’m not bothered by command-line jobs but you also explained it very well. It just took a couple of minutes to download and try my first run. It works very quickly and I successfully converted a 2mb flv file to mpeg, wmv and mov, each in just a few seconds. Thanks for making this available for free.
hi nice
I had the same problem same as you ive looked for days great guide =)
You, are seriously awesome. Such a great guide and so simple to follow. I feel so techish now. That will go away as soon as I interact with other technology…but for now, I’m savvy.
Thanks again!!
hey awesom program, but how do you covert from to 3gp format?
i convert mpeg to flv .but while playing flv in the flvPlayer i could not go to the specific position of the video using the player slider.
is this the problem of player or the problem of converting using ffmpeg
can anybody provide to the full code for converting mpeg to flv using ffmpeg
THIS IS REAL SOFTWARE!!!! i have been searching for such command line tool for a quite some time…its faster than geovid which costs 1500$…i actually need to put it on my web server and my application to convert from any video file to flv… from which formats to .flv i can convert???
mickyG i did the same thing for 5 times with different files and it is working just fine…its the payer that makes problems…try this http://www.martijndevisser.com/blog/article/flv-player-updated
works perfect
http://ffmpegx.com/ for the mac version (including GUI).
Quite buggy sometimes though…
Excellent. This is nice. Thank you computer god.
I would really like to thank you. This works amazing!
This is great! Thank you so much! 😉
If it’s not too much to ask, could you also provide the instructions in converting nrg files to wmv?
Thanks a lot!
THANK YOU SO MUCH FOR THIS!
Moyea FLV to video Converter can do that more easily. get it at http://www.flash-video-mx.com/flv_to_video_web/
ED – This is a paid product ($39). I’ve not tried it. It appears to have some useful features such as watermarking and cropping. Anyone uses it, please add a comment.
great guide and so simple to follow
thaaaaaaaaaaaaaaaaaaaaaank u thaaaaaaaaaaaaank u thaaaaaaaaaax 🙂 🙂
Every time i try it says that th .flv file is corrupt. But i have tried several different websites that take .flv video from youtube and have tried different videos. What do i do now?
contact me at EDITED_BY_BLOG_AUTHOR@sbcglobal.net please
ED – It sounds to me like the FLV files are probably ok, especially if you have tried different sites that generate FLV files from YouTube. Most probably the player you are using is misreporting a problem that doesn’t exist.
I have an easier ridiculous way to get to the command line. Google “powertoys XP” and download the command here powertoy. After you install it all you have to do is right click the folder you want the command window to open to, then choose “open command window here.” Also, an easier way to get to the command window is to choose start-run-and type “cmd.”
I’ve been looking for something like this all over the place! Thank you so much!
I really cannot thank you enough.I have tried a thousand things, nothing worked. Thanks to your simple method, I have made my daughter’s day and she is now the proud owner of some of the most wanted music videos. Thanks again.
I downloaded Super off of the eright web page.
I then tried to use it to convert flv to mp4
It quit (failed to completely convert) on the first file, leaving behind a 48 mb partial conversion file.
Then it hung on the second file and endlessly ate up my disk space in chunks of 3mb at a time (as fast as I could hit the refresh button, that’s how much disk space I was losing). The conversion file was over 640MB in toto (showing in super) but nearly 2 GB of disk space had been eaten up and was continuing when I cancelled the conversion. CLosed Super. Disk space continued to disappear in 3 to 4 MB chunks until I was down to my last 95 MB of space (on a 34 GB drive). Clearly something was still running even though I had shut the program down completely.
I then deleted both of the conversion files left behind by Super. I uninstalled Super. My free space returned to normal. However, AVG shows that even after uninstall, Super left behind modified versions of kernel32.dll, user32.dll, and ntoskrnl.exe.
Good, well-designed software doesn’t modify or change important system files like that. It especially doesn’t fail to restore the system to the way it was before it was installed after it’s been uninstalled.
When I posted the problem to the eright Super forum the developer deleted the posting – TWICE.
It’s one thing for software, especially freeware, not to work. It’s quite another for the developer to try to hide that fact from unsuspecting users. Since he kept deleting the problem report off of his forum I can only conclude that that is what he is doing.
I recommend against Super or any other software from eright.
thanks!!! You really explained it well that’s why it was easy to follow. I’ve had the same problem before regarding shareware and freeware converters. But now I can convert my files! thanks again!
Thank you so much for this! After searching the net for along time for a free FLV converter, you have saved the day!
Much thanks, now I can convert my Youtube .flv to .mov
hi you are a wonderfull person
i am really exited it worked so cool
thanks a million
i followed everything exactly, when i type in everything i get an error, says input is corrupt and/or truncated.
🙁 i taught i finally found a converter for free that worked
ED – Sounds like you have a problem with your source video file. As the many comments above show… the system does work!
This is cool. Is like running the matrix! I love this thing
I have been sitting at this computer for hours trying to download a video that I love off Youtube. I’m almost ready to give up, as I am not the most technological person in the world. All I want is to be able to download videos off Youtube and watch them on my Ipod video. Could you please help me?????
ED – You could try keepvid.com
If you get the error “input is corrupt and/or truncated” its seems to be because the file does not have an extension eg – dog instead of dog.flv so rename the file with an extension – rename dog to dog.flv if it is an flv file etc – works with youtube vids which dont seem to have the extension attatched
It didn’t work for me. It installed fine but when I converted a flv it made a 0kb file that nothing could open. Please help!!
Thank you so much! You saved me many fruitless hours of searching for a converter, and your instructions are clear and quite easy to understand.
Hi,
Thanks for putting this up.Makes me feel like a real pseudo techno geek!! 🙂
However, my problem is when it’s trying to come up with and output – I get this message:
Unable for find a suitable output format for ‘i’.
This is after the files have been renamed to flv etc. Everything is sweet up until this point.
Any recommendations would be great.
Hello —
Thanks for the site and info, it is pretty cool and not as hard as it first seems.
My one question/problem is that no matter what I seem to do no flv files convert with any audio/sound – the video comes through but no audio. So just wondering if anyone else has this problem and if there is something I should try.
Thanks!
ED – Please see my note about this above near the bottom of the article
this is the most cool command line shit i have ever come across… VERY GOOD JOB MAN.. 10/10 for you.
I also found that another reason one could be getting the “input is corrupt and/or truncated.” error message is that you may have spaces or punctuation in the source file name…rename the source & destination file a single word like in the “football.flv/football.wmv” example given and it works beautifully
Hey, Being not computer savvy, I had a little trouble installing this, but did get it installed. But when I try to an flv file to wmv, I get an I/O error saying “The file is truncted and/or corrupted. Every file I try says that. Does anyone know what I could do to solve this? Thanks
Excellent guide, well done….worked perfectly the first time…..
Q
Sorry Alx, I hadn’t read all the comments and repeated something someone had already mentioned. I have since then read them all, and my problem is fixed. It worked GREAT to convert flv to wmv!! That’s sweet! Now, how do you convert flv to mpeg-4 to play on an iPod? I got mpeg, but seems I need mpeg-4. Thanks much! Nice program.
Hi, not sure if anyone will reply to this but I have given it a go and at the end the file conveted cannot be read by WMPlayer. So I tried converting to AVi and only the sound will be heard.
Any suggestions would be most welcome..
As a note, the .FLV files do work in the correct player. Names of files are in Japanese text. As I cannot type Japanese into the command line interface I just copied them there instead. All seemed to work fine until the above mentioned.
Never mind previous post please 🙂
I decided to give it another go and downloaded the megpack instead of the latest version and the mpegpack worked just fine.
Just a side note, in some of my file conversions I recieved the message error “input is corrupt and/or truncated”.
What I found is to remove all ( ! : \ marks in the file name and perhaps shorten the file name. Not sure if shortening the name made a difference but it did solve this issue. 😀
I’ve posted this a few days ago, but it hasn’t shown up yet.
There are two great, very simple programs you should look at.
One is called Vdownloader
http://www.vdownloader.es/
and the other is called Winff.
http://biggmatt.com/home/
They both are front ends for the ffmpeg.exe converter, except that Vdownloader downloads the file and converts it. You already need the file for Winff, but it also will convert almost any format to any other format.
yeah this little piece of software saves the day of hours and hours of searching the net for good flv converter thanks
Superb … does what it says on the tin … TVM
hi man iread youur article it very nice
but you dont explain how to make this process on linux server .
Thanks and in Turkish “Eyvallah gozum”…
Great site! Thanks a lot for this advice!
Gah, you’re a lifesaver! I’ve been trying to convert two FLV’s of a short film and interview featuring my favorite actress, but they were wrapped around in some kind of proprietary wrapper that prevented me from extracting them my usual way (with CinemaForge). I tried 13 programs, but they either didn’t encode the video right, screwed up the audio, or just didn’t work without an ugly watermark. This worked perfectly, and now these files can go on my iPod :)! Thank you!
Thankfully I clicked on the link from google to your site after I saw ‘tearing your hair out’. I wasn’t going to bother reading your instructions, but after a few lines found that your explanation was precise and lucid. Thank you for offering such effective and efficient software and instructions for no cost. Much appreciated! (You should put up a donation/paypal link: I’d donate.)
Nice little application, easy to use, and it works great. Your instructions are top-notch, welldone!
Wow! Usually when i get programs this small they end up rubbish, but this one is just so good. Im only on dial up 🙁 coz i cant get broad band and all the other programs that work are too big to download. Once i figured out how it worked converting videos was a breeze. Now I can download videos from youtube and stuff and put them on dvds and stuff coz i always wanted to do that. Thanks a lot for the great program!!!!!!!!!!
I tired of being browsing the net to find the flv converter untill I find this site.
I follow te guideline and I’m very thxfull to you bro.
First time I try, I have problem with the ffmpeg. My file which try to convert is “A for Allah.flv”. the message is I/O error occured.
Then I rename the source file to “Allah.flv” then I do the procedure. And Its Work.
I suggest if you find the problem try to rename the source file that consist only a word.
Happy convert your flv file…
ALX – Good tip. I’ll work this into the article. Thanks.
u rock man !! \m/ i was looking for flv converters for quite while now thx a lot by the i was just wondering how did u get to know this?
M. Robert Aryana said:
“I tired of being browsing the net to find the flv converter untill I find this site.
I follow te guideline and I’m very thxfull to you bro.
First time I try, I have problem with the ffmpeg. My file which try to convert is “A for Allah.flv”. the message is I/O error occured.
Then I rename the source file to “Allah.flv” then I do the procedure. And Its Work.
I suggest if you find the problem try to rename the source file that consist only a word.
Happy convert your flv file…”
If I’m not mistaken [I’m using win me], you could use /x syntax on the dir command [on windows xp] on your command prompt, so it would typed like this “dir /x”, but if you’re using older windows such as win me or 98, you could try “diw /w” then type it’s filename. Usually the filename only appear in 6 character, in example “diggy doggy do.flv” will be “diggyd~1.flv”
OR
If the above won’t work too, try using a quote character {“}, so it will be like this
ffmpeg -i “diggy doggy do.flv” diggy.wmv
I hope this will help
May the force be with you… =P
Thank you so much for writing this! I was able to convert some videos taken on a recent trip with some friends, and this will also help other friends!
THANK YOU!
Wow. I have searched forever for a good converter. Thank you. I love you.
Hey there… I’ve done all the stuff you said, having tried everything else I’ve found, but I keep having trouble with file types. It’s as if it doesn’t recognise flv…
“C:\Documents and Settings\Todd Davidson>ffmpeg -i monster1.flv monster1.avi
FFmpeg version SVN-r7760, Copyright (c) 2000-2006 Fabrice Bellard, et al.
configuration: –enable-memalign-hack –enable-gpl –cpu=i686 –enable-swscal
er –enable-pthreads –enable-avisynth –enable-mp3lame –enable-xvid –enable-x
264 –enable-libnut –enable-libogg –enable-vorbis –enable-libtheora –enable-
faad –enable-faac –enable-libgsm –enable-dts –enable-a52 –enable-amr_nb –e
nable-amr_wb
libavutil version: 49.2.0
libavcodec version: 51.29.0
libavformat version: 51.8.0
built on Jan 29 2007 19:58:47, gcc: 3.4.6
monster1.flv: Unknown format
Please don’t hesitate to get in touch by email, this problem is really annoying me.
ALX – It is not recognizing the FLV file you have for some reason. Have you tried any other FLV files besides monster1? It may be that the one you are using is somehow corrupted. If you try 3 or 4 others (make sure they are from different places) then let me know. Nobody else has reported a problem like this.
Wow, so much easier than i thought! My only problem comes when I try to burn the clips to DVD. It won’t let me burn .wmv or .avi files. any suggestions?
ALX – Creating DVD’s from AVI files is a complex subject and there are many tutorials on the net providing a range of different solutions. I’ve had success using a program called DivXToDVD from a company called VSO. They also make a program called CopyToDVD which is very good and easy to use.
that is the simplest command i’ve seen. And people are selling it for $30 to $50!!! Thanks man! You are the best!!!
Error message every time…”could not find video grab device.” I have VLC player, WMP and RealPlayer installed. The program creates a 0 byte file as has been noted by many above,,,tried numerous files, renamed with .flv file extension, changed to single word file, etc. with the same results. Any ideas?
ALX – The video grab device message is likely the heart of the problem you are experiencing. I’ve not seen this message before and it doesn’t ring right somehow. It should not be trying to find a video grab device (eg a video input board). Do let us know if you solve the problem, in case anyone else has it.
this is really usefull, i missed that -ar 22050 so the flv cannot be played.
thank you
Great post – i’ve been struggling horribly with mencoder for converting to flv, and ffmpeg just works. Fantastic, thanks!
BTW, i’m deploying to a unix server very soon – is there anything i need to watch out for when using ffmpeg in unix rather than windows? Is there a unix version?
thanks again
ALX – Pre-compiled versions of FFMPEG are hard to find, hence the one I’ve provided here for Windows. FFMPEG can be compiled into *nix, you may have luck with this article. Good luck!
That’s a great intro to ffmpeg. I came here from Google, looking up the right syntax. 🙂
For Mac, you can find A LOT of open source, ready to compile from source automatically (the way Gentoo Linux and the BSD Unix projects do it) using the MacPorts project.
Installing ffmpeg on my Mac with MacPorts was easy:
sudo port install ffmpeg
This downloaded the latest ffmpeg source and compiled it and installed it so I don’t have to enter the command in a specific directory. It’s added to the shell PATH and all. Even the Unix man pages are installed.
20 minutes after entering that command, I was ready to convert my videos.
Seriously, if it is open source and command-line based, MacPorts more than probably has it already to go for installation on your Mac. http://www.macports.org
ALX – Great info thanks for the contribution
i downloaded your “ridiculously easy to use” pack and thank you so much. it IS ridiculously easy to use!
I thought it might be useful to add an example of a bat file for the purpose of converting several files in a row without typing command line each time.
1. Create a folder on your c drive named “FlashVideos”
2. Create a new text document in your new “FlashVideos” folder and name it what you wish (example “Convert.txt”).
3. As an example imagine you have three files in your FlashVideos folder name “File 1.flv”, File 2.flv”, “File 3.flv” Enter the following into the text file:
cd\
cd\FlashVideos\
ffMpeg -i “File 1.flv” “File 1.wmv”
ffMpeg -i “File 2.flv” “File 2.wmv”
ffMpeg -i “File 3.flv” “File 3.wmv”
pause
4. Save the file as “Convert.bat”
Make sure you have ffmpeg.exe, Convert.bat and all flash video files in the c:\FlashVideos folder.
5. Double-click the Convert.bat file and all files should be converted.
This method will simply speed up the process a bit so you don’t have to run the command line process over and over again.
Note – In order to alter the bat file you will need to right-click the file and choose edit.
I have written a small application that will eliminate the command line interface. There is no UI, this is simply a command application. .Net 2.0 is a pre-requisite.
You simply need to place an exe file and a configuration file in the same folder as ffmpeg.exe and the source files.
In the configuration file you can set the source file types, destination file types, and switches.
Then double-click my exe file and all files of type source will be converted into files of type destination.
Sample configuration file (with default values):
key=”sourceFileExtension” value=”flv”
key=”destinationFileExtension” value=”wmv”
//Separate switches with a comma. Example value=”-i,-u”
key=”switch” value=”-i”
I would be happy to provide this application to you Alx if you would like to take a look. You are free to do with it what you wish.
ALX – Thanks for this!
Success at last! Thank you! I knew there had to be a simple answer somewhere. I think most converter programs assume you want to convert copyrighted material or other such stuff and that’s why they put so many restrictions in or charge so much. I just needed to get MY OWN videos off of photobucket (.flv files) and back onto my hard drive after I had a crash! Now I can make a DVD of my baby’s first half-year! (how’s that for an emotion-inducing testamonial? Well it’s true!)
Im getting the same problem of
Could not find video grab device…
Any Ideas yet?
ALX – Has anyone found a solution to this? I’ve not been able to replicate it
Love it.
I was getting poor output files.
Discovered the option -sameq before the output file name does the trick.
Great tutorial. This is just what ive been looking for and it is REALLY easy
First off,thanks for posting this great guide.It is a rarity to find someone on the net whom actually wants to help others without filling his/her own pockets,(currency wise,lol) but I am having issues with the software.I have done all that is stated in the tutoral,entering the exampled ffmpeg -i football.flv football.wmv (replacing “football” with my file name) and it states ‘ffmpeg is not recognised as an internal or external command,operable program or batch file.Please help. Thanks
Help! It all worked great until I got to the point where I burnt my converted .wmv files to a DVD using Roxio. The DVD quality was terrible, very pixilated. Can someone please suggest something to bring better results?? Would converting to a different format (maybe avi) be better for DVD quality? I read the earlier note about problems with WMPlayer and avi but I’m note concerned with WMP, only burning good DVD’s.
thanks much!
I followed your instructions(4 times)and all went well until I entered the command prompt to begin conversion and received the following”ffmpeg is not recognised as an internal or external command,operable program or batch file”
I am using Windows XP
This was working brilliantly up until the other day, now I seem to be having the same problem as mkh & Chris listed above. When I start the conversion I get this message “ffmpeg is not recognised as an internal or external command,operable program or batch file”. Does anyone know how to fix this? Please help. Thanks
ALX – Hi Mike. Thanks for this as it confirms that there is indeed a ‘developed’ problem. I’m thinking that a Windows update or something similar has broken the program. Weird but possible. Any info you could give on what might have changed on your system in the last few days would be helpful. Please also confirm which operating system you are using and any programs you’ve installed in recent days. Anyone for whom it’s still working.. if you could weigh in that would be great. TIA.
I had the same problem as Chris mkh and Jimmy when I downloaded the newest versions. In the end I deleted them and downloaded your ‘Easy pack’ instead…and it started to convert. But it keeps saying “unable to find a suitable output format for…” Is it because I’m trying to convert to mpeg4?
ALX – Hi Carrie. Thanks for your comments. It may well be that the other people were not using the easy pack, although it would be great if some other people could add weight to this notion. I’m unfortunately not able to test it at the moment as I’m confined to Mac only, but you may find help at http://ffmpeg.mplayerhq.hu/ffmpeg-doc.html – This is the documentation for ffmpeg. One command you can enter is “ffmpeg -formats” without the quotes. This should give you a list of which formats are supported.
Thanks for sharing
Alx Klive for President!
Just wanted to THANK YOU! for FFMPEG… It works just fine. I converted a couple of my MPEG’s to FLV. The MPEG’s were around 48MB and the FLV’s were only about 8MB. Oh! And the price was right $0.00. Thanks so much!
This is amazing A++
get the UnPlug extension for firefox to get the .flv and then convert =)
It was wonderful. I have been able to convert to wmv, mpg, and even dvd. thanks a lot.
I found your instructions very easy to follow thanks, I did everything you said & everything seemed to be going fine until the end when I got the message:
“Unable to locate component – application failed to start because pthreadGC2.dll was not found. Re-installing the application may fix this problem”.
I havent done anything else yet. I have windows xp professional with service pack 2.
Suggestions?
ALX – You’re the first to mention this error. I did a quick search but could not find any answers. Sorry, but it sounds like something that might be quite unique to your system. If anyone else comes across this or has any ideas, please let Vickie know through these comments. Thanks.
very nice, works on almost everything I have tried it on. You Deserve a Big Gold Star!
I love love love this program! But whenever I convert things it always comes out a little pixelated. I’ve played around with the commands to try and fix this but nothing ever seems to work. Is there a specific command I could use to get a better quality in the videos?
Okay, in the time I posted my last and now (about five minutes later) I not only tried the ffmpeg program out, but got it converted — all in the span of mere minutes (well, about 2). Worked great — the video is perfect.
Using XP, with all service packs, and downloaded your easy zip file containing ffmpeg and the text instructions.
BTW, that “pthreadGC2.dll” not found is most likely due to specifying a codec not supported or installed (H264 is most likely). I’d suggest most folks convert to WMV just because it’s safest — you can always convert to another format from this one.
For the people with the “not recognized” problem that’s most likely due to their environment variable settings altered by some application they installed. Check the environment for this (My computer/Advanced?environmental variables).
What else? Um, don’t use Roxy (bg) but the quality is most likely due to the source. Convert to WMV and then use a good upsampling MPEG program (Adobe Premier is best but $$$) to create a good quality MPEG for burning.
(I’m a computer/video expert who made DVDs for a living so I have expertise in video conversion/burning/etc).
Anyway, thanks as I can now put the Flash video conversion thing behind me (the last piece of the puzzle — was not looking forward to dealing with Flash :>)
jace riggs wrote:
The program creates a 0 byte file as has been noted by many above,,,tried numerous files, renamed with .flv file extension, changed to single word file, etc. with the same results. Any ideas?
Hi I had the same problem. the cause was putting the FLV extension onto a non flash video file. Contrary to popular beleif, YouTube and others do not exclusively host FLV content. Rename the file to .AVI, or .WMV, or .MOV, etc, or what it actually is and try again.
If you don’t know what kind of file it was, dotwhat.net could possibly help you.
Russell
now i have downloaded this converter and i cant seem to find the file ffmpeg as i put it where irs meant to go and it does not show in the command promt, when i type in the code `ffmpeg football(as i have called it).flv football.mwv` it does not woprk and says something along the lines of `ffmpeg is not recognised as a internal or external command` so plz tell me how to fix this error.
You sir, are my savior. Thank you so much! I spent six hours today bumbling around freeware, so you have no idea how relieved I was when I came across your exceedingly helpful how-to.
Thanks again,
T.S.
Error “ffmpeg is not recognised as an internal or external command,operable program or batch file” means that windows cant find file ffmpeg.exe in the known location to execute it.
Be sure that you have followed the instructions above carefully as they do work and are quite simple.
There are 2 other solutions…
1. Copy ffmpeg.exe to the folder described in your PATH variable, for example c:/windows/system32 folder.
2. Add folder where you install ffmpeg to the PATH env variable.
Dude, you rock! FFMPEG is great! Actually the one I downloaded from the zip file gave a message during compiling that the codec libary crashed. It produced a wmv that had
audio fail after about 80% of it being played. The one from the latest link (in the tar file) works beautifuly thought. And
working at the command line is no problem for me … I’m Old!
command line is always the most direct and effective way. Save time and save money… thank you
To hell with GUI.
This way’s alot better.
WOW, I’m officialy a geek! Thanks dude, I really appreciate this. I had a few hucups
but they were mostly my fault. To any sceptics, this works. I’m glad. All you need is good observation, & patience.
Thank you again. This is great!
duuuuuude, i tried everything you told me to do, and it worked out fine… until it said that it “could not find codec parameters.” can someone help me with that, please?
Thanks a lot for this, you just saved a Y10 lesson on persuasive techniques for me!
WOW! Thanks dude, I really appreciate this.
It is very much usefull for me, I Example that you explain in article working very good. It save my lot’s of Time.
You have done a great work.
Thank You,
Thank you so much for the instructions! I am not particularly computer savvy but this was easy to follow. I have tried so many conversion programs but they didn’t work or I would have to pay. Thank you!!!
Much appreciated Alx!
Been messing around for weeks unsuccessfully trying various flv converters. This method did the biz no problem. :^)
Could annyone HELP me to find a decent, free, flv dowloader?
This program works just GREAT, but, unfortunately my flv downloader is not functioning anny more
thank you in advance
The WorldTV platform allows you to download FLV files from a personal collection that you create – set up a channel on WorldTV, add some clips (eg by URL) and then right click on a thumbnail of a video to get the option to download it. This is a Beta feature so user beware, but is a useful hidden gem of a feature.
Thanks a billion and i have some hair left after pulling it all out searching through the free sharware crap.
jj
Interesting and useful article, thanks.
To reiterate what has already been said, thanks so much for putting up this helpline – I now (at least partially) understand some of the techno babble about command lines on some websites I’ve come across. My one query is I get how to use “-sameq” which is brilliant, but the file size is just a tad too big for what I want. I came across “-fs limit_size” but I’m not sure how to use it correctly. For instance, doing a simple conversion of a 104Mb flv file to avi, the avi = 43Mb. Using “-sameq” it comes out as 193Mb and I really want it 100Mb (so the quality is better than the 43Mb conversion but the file size is smaller than the 193Mb conv.) Can someone help?
thanks, Alx!
Thank you so much! I’d been racking my brains trying to figure this program out!! Cheers =)
Awesome, great tutorial. Thank you!
One question. I’ve converted an FLV to WMV using the -sameq command, and the audio is slow/lagging. Would this be because of the -sameq command? Is there another way I can convert my FLV so I have the same quality and good audio? I intend to make a DVD, so I really need good quality sound and picture.
Any help would be appreciated!
ALX – Am not familiar with that command. Some quality loss is inevitable with any conversion between formats though.
Works perfectly, for a white bearded computer user who began with DOS, 4DRDOS and UNIX it’s a breeze. For the others, it’s just a bit of mental work. Surely it’s possible to make a direct command line and even a batch. I’ll see if I have time.
A small tip: it’s easier to prepare quietly the command line with notepad, specially when the names of files are complicated or you’re using a lot of options; copy the finished command on notepad and paste it in the C: invite box.
The doc is a simple html page easy to copy inside the folder so you have it at hand.
I almost forgot: MANY THANKS!!!!!
The tip of the the Google “powertoys XP” is excellent use it.
thanks a bunch!!! I appreciate, it’s sooo easy!
I kind of *heart* you right now. You don’t understand how long I’ve been searching for a free FLV converter, and how many bogus ‘free’ converters I’ve DL’d, installed and then had to uninstall.
Your directions were super simple and easy, and even if you knew nothing about computers at all, you could still get it right.
Thanks so much for putting this up!
Cheers,
LilMiz
good stuffs.. I been using ffmpeg quite sometime now thanks to you.. 😀 though it is just a command line but it is simple yet powerful…
I used ffmpeg an found the video quality after I converted to wmv from flv is not as good as the flv quality also the sound was not aligned correctly with the video.
Any ideas why this would be?
ALX – Some loss of quality is inevitable with any video conversion. Not sure about the audio sync issue but it’s not uncommon for this to happen when playing around with video.
I am looking for a Java API to convert MPEG, MOV and other video sources to FLV format ; does anyone know how to do this conversion using Java? thank you!
My website is DVD-Creators.net. It provide wide solution for Video Converter including flv Converter.
Dude! I love this program. Been using it for the past couple days converting everything to pretty much everything else, messing around in movie maker, putting stuff on my ipod. Definitely a keeper.
I did every thing you said. Ikeep on getting the same message over and over.
unable to find a suitable output format for ‘i’
If you could help me out I’d really appreciate it.
you can try moyea flv to video converter, download and convert youtube video flv to avi,mpeg,wmv,mp4 eailsy, hope it can help you!
THANK YOU Soooooo Freakin’ Much!!!
Excellent!!!!!
Very easy to follow example. liked it , thanks for sharing the knowledge. exactly what i needed…
Quite possibly the best flv converting tutorial on the web. An no need to download junky freeware!
Thanks!
Thanks a lot………………………
You are a genius guy……………….
Thanks you very much ………………
Hey thanks for the trip down memory lane. Before GUIs there was DOS. I was surprised how much I remembered.
Use the F3 key to repeat you last step on the command line and edit the text by arrowing over and changing.
Thanks again.
My God, what a great converting tool! I tried all those “free” flv converters and was getting quite disappointed until I read your tutorial. I tried it today and it works great. Thank you x 100!!
As happy as I was with the ffmpeg tool yesterday, today I have doubts. I was breezing along converting flv music videos when I hit a snag with one video. Immediately, all my C and D drive folders and files took extremely long to open. I spent the rest of the day yesterday and all day so far to find the problem but no luck. My online surfing was not affected. I may have to do a system recovery. Anyone else with similar problems? Does the ffmpeg tool have issues with Vista?
(ED – I’ve not used it with Vista so I can’t shed any light on this. Anyone else have experience on this?)
Mac users? I have a Mac FLV converter for you. Either convert FLV to AVI, MPEG, WMV, MPG, MP4, 3GP, XviD, DivX, DAT, MOV, MP3 music, WMA, OGG, etc. Or convert them to FLV FlashVideo format.
http://dvdvideosoft.formacos.com/flv-converter-mac.html
(ED – This is a paid product – $35 FYI)
Muahaha it worked after my damn shinnaniganz kept sayin error and the trunscated corrupted crap all I did was change the file name in your documents area and dont put .flv but keep it only as ONE word!! but only put .flv on the command prompt hope it works for anyone else THNX LOTZ ALX!!
Thank you! you saved me.
It’s possible to batch file the command line process to simplify everything down to just typing in the name of the file. An example of one of these batch files (one that I use frequently) follows:
@echo off
echo Enter source filename:
set /p Source=
ffmpeg -i flvs\%Source%.flv c:\music\videos\%Source%.mpg
I named this flv2mpg.bat, saved it in the same folder as ffmpeg.exe and just type flv2mpg after that to convert. I have batch files for flv to mpg, flv to wmv, and flv to avi.
* This takes some tweaking to set up to the way other people have it, but my flvs download right to a folder in the ffmpeg program, then I just run the batch and delete them after.
wow! this was so easy man, thanks soooo much, i feel like such a computer geek! 🙂
Thx alot, great tutorial!
You rock dude!!! your the man!!! your ffmpeg is so easy to use yet it’s the best in the universe! thank you very much! ^_^
i wanted to convert u-tube flv file to mpeg2 for creating a PAL DVD disc by following ur instructions. however i get the following message.
“seems stream codec frame rate differs from container frame rate:1000.00 57.92
unable for find a suitable output format for ‘filename.mpeg2
would u please give me solution? thanks
madhav
Hi i successfully converted the videos to different formats in cmd.But when i want to call it by using exec in my php file it wouldnt convert.Could u please tell me how can i call cmd in my php file using exec?
Thanks in Advance
ED – That’s beyond my expertise, sorry 😐
I would like to offer you my first born, but she’s 18 and a little uppity, so if you would prefer my second or third, I would be happy to make either available. (They poop a lot though…)
Failing that. I am going to have to go to WorldTV and figure out how to send you money somehow.
Thank you very much. This is clear and concise. I had more or less come to the solution you show, but I didn’t want to have to go through it all and try over and over. BAM on the first go round with your article. THANK YOU! My boss will like me and keep me employeed another week. :-0
I just wanted to let you know that you are my hero. I have been looking for what seems like weeks to find something to completely convert .flv to .wmv! Thank you so much!
ffmpeg works for most FLVs, but fails on the latest vp6/h264 files. The Windows version is just too outdated – I heard the problem was recently fixed with ffmpeg r14480. Mencoder and other ffmpeg-based tools can’t even play these files under Windows. VLC can, but it produces stuttering audio.
So far, I haven’t found a freeware solution, since most freeware is based on ffmpeg…
ALX – This is v.interesting. When I have some time I’ll look into it further to see if there is a solution
Wow…that’s all I have to say. There is a video on Crackle.com that I am an actor in, and I had been wanting that content to add to my actor demo reel for some time. For some reason the director never made a dvd quality copy, or even made available the web formatted copy. I used Replay Media Catcher, which finally grabbed the video in the HD format that Crackle offers (no other media grabbing program could grab the video at all). It saved it as an .flv container and I suspect some propriety Applian (makers of Replay products) codec, becuase no program under Mac or Windows could read the damn file let alone re-encode to a format that Final Cut could use (Final Cut does not read .flv sadly). Not even Super. FFmpeg did the freakin’ trick! Not only did it read it, but using the -sameq command it saved it in the same quality as the original! I am absolutely stunned and want to throw this info in the director’s face; even “dumb” actors can figure out a thing or two. Thank you Alx and the makers of FFmpeg for a fine product and an informative guide!
This is a nice post, but i do have to say, the lack a GUI for ffmpeg is not because it allows ffmpeg to “stay under the radar”. FFMPEG is a backend…like divx, or microsofts codecs. Just as with those codecs there are GUI front ends to make things less complex for the user, but these are still developed seperately from the core codecs.
The lame mp3 encoder is a good example of another codec that requires licensing, but still has great front ends that work with it (lame stands for lame aint an mp3 encoder), and you can find binaries of it all over the place distributed as libre software, even though its technically not allowed in the US.
Also i’d like to add that avidemux is a fantastic cross platform front end for FFMPEG and mencoder, and has been around since before you posted this article.
Sorry if it seems like i went off on a rant here, just trying to be helpful…. nice site. Check out avidemux sometime, for realz.
ED – Avidemux looks like a nice simple video editor with some encoding and filtering capabilities. I’ve not tried it.
I never take the time to comment, but THANK YOU!!!! You rock!! I love that someone finally taught me something about the command prompt! And of course that it is an amazing program too. Woo Hoo!!!
If I every planned to give birth I would name my first spawn after you. I’ve downloaded SO MANY converters and I always end up with trash. Even my professional geek husband has been telling me there aren’t any good products out there.
I haven’t dealt with a C:\ prompt in years. It was almost a nostalgic experience. You are brilliant for this process, and I am brilliant for having found you. I can’t wait to rub this in my geekman’s geekface. I heart you.
ok, i followed the directions, but i can’t get my command propmt to “recognize ‘ffmpeg’ as an internal or external command, opperable program or batch file”. what did i do wrong?
This is a great program, and I’ve been using it successfully for a year now. However, I’ve just been browsing at Imeem, and nothing I’ve downloaded can be converted anymore – Command Prompt tells me that it can’t find the codec parameters. Has Imeem done something recently to block ffmpeg? Thanks!
ED – Susan it sounds like they may have switched to a more recent codec, perhaps H264, for their videos. It’s probably long overdue for me to update this application and I’ve uploaded a new 2009 version here. I’d like to hear from people their experiences with this version as I can’t possibly test it in all scenarios. If it seems to work well for people I will update the link in the article above.
THANK YOU! I’ve been searching FOREVER for some way to convert my flv files that was free and easy to use. The AVS Video Converter which I downloaded seemed to work at first, but then I found that all the videos then had AVS’s name plastered over it. (Grrr!) Then, today, I stumbled over this guide, and now I’m in “geek of propeller head proportions” paradise! Thank you SOO much!
this is the best thing i have ever seen or tried for flv converting. thanks a lot!!!
i have a mac and i’d like to be able to do this. i tried to do what max williams described, but to be honest i have no idea what he is taking about. i downloaded macports, and entered the command he gave. the system didn’t recognize it though. I’m a little lost, and any help would be appreciated. thanks!
Ok I have got the Command Prompt and I put it in there… but I don’t know how to get the .exe version. Also when I type it in do I put a space first then type “ffmpeg -i football.flv football.wmv” (but having my file not football Someone please help me I’d really like to have my .flv files converted.
Taylor, you might have to put the full pathing in if the file is not in the same directory are the converter ie. c:\football.flv etc.
Great article. Everyone ought to have an idea how the command line works. Since most shortcuts and many other parts of windows rely on the same or very similar technology, though wrapped up differently. Yours is a careful and comfortable introduction.
A note about the whole ‘one word’ file name issue, for those of your readers who care.
The exact specification is up to eight characters a dot ‘.’ and three characters. and none may be a space or any of .?:;>%/\ though it’s safer not to use anything with – when dealing with programs developed to be cross platform. so generally keeping to 8.3 and just numbers, letters, and underscore _ is the most fully compatible method.
Often called 8.3 for short, it’s been around since the original dos, (maybe even cp3/m before that?)
Under window95 and later If you use more characters than the standard dos 8.3 spec or if your file name has spaces, you must enclose the whole thing in double quotes like “a long filename.strangness.flv” or if you’re working outside your home directory (folder), the directory name itself may have spaces included such as “C:\Documents and Settings\owner\My Documents\normal.flv” has spaces in it already and even though your file may keep the 8.3 rules the spaces in the directory names will require the whole thing to have double quotes.
But in general extra dots will confuse most programs constructed early enough that they didn’t have *nix systems to worry about or other laze reasons.
And extra spaces and “”‘s make it harder to proofread your command for accuracy before sending it off.
Thanks again for the DL links.
Works easier than one would think, thanks a lot !!
2009 ffmpeg is just fine.
Your documentation is great. I can get everything I want from ffmpeg except for inswerting a stop frame into the swf file. I cannot find any option that does this. Am I missing something or is this the state of the software?
Thank you SO MUCH for this! I love simple programs that just do one thing but do it well, and like many here, have been beating my head up against a wall trying to find a good free solution that actually works.
Can’t thank you enough.
Jaime hit the nail on the head!
I too “Can’t thank you enough”. I Love and miss the old comand line days. Works clean and simply.
Thank You Kindly Sir!
CL
I just want to say I used the 2009 version and it works after using the first version and that did not work but it was after I scolled down further that I came across it. Both computer hard drives, we had one for a back up, become corrupted I am told, if anyone can help with this I would appreciate it, lots of valuable and much needed personal information on it and unable to retrieve this info, so I’ve been told. Now a new hard drive and having to try to put it all together again, it’s all feeling quite strange but we’ll get used to it. The main thing through all of this is that I feel I’ve learned so much more and now being able to convert my flv files so easily is wonderful. I never thought I would be capable of doing this but after reading some of these other comments I thought why not have a go. So there is one good result out of everything else. Not that happy with my computer’s performance as yet but that might be a job for my son when ever I get to see him again. The computer guy who put this together has been paid so there is no more interest in helping me sort out the things that I’m not happy with.
Keep sharing all that valuable information, It feels great to be able to do something with the computer at my age without constantly nagging someone else. Very clear instructions, just this new computer not exactly where things should be but I battled on and found where they were. Thanks again. If I lived near you I’d buy you that beer.
thank you for your super easy to use directions!
Fantastic! Couldn’t be simpler. For some reason I get only audio out of converted AVIs in Windows Media and Nero Showtime, with both your original and 2009 versions (haven’t tried “option 2”). But the AVIs work fine in VLC so perhaps it’s a codec issue. Otherwise it’s great, and fun to travel back in time to DOS world.
Hey there, thanks very much for the guide. You explained coherently and thoroughly. I did not have any problems with it. However, no Mac version available?
Brilliant, brilliant brilliant. Thank you for your clear and concise tutorial. Who says theres no such thing as altruism! You totally rock
Thanks, nice converter that I’ve used successfully before, but recently was unable to convert a 22mb flv to wmv, getting the error message “I/O error occurred, usually means that the input file is corrupted or truncated”
Then tried the new (2009) ffmpeg file on it and got the error message “No such file or directory” (though file names and directory are correct)
Maybe it’s the d’loaded file that’s causing it for some reason.
Further to my previous comment – got the file to convert successfully using the old ffmpeg after I renamed the d/loaded file with a continuous (no spaces) name. Then tried to convert using the 2009 ffmpeg file but although it converted to wmv, the file would not play (unknown format message)
ALX – This is useful feedback thanks.
Thanks for the information. I had forgotten about this utility, and was very happy to find that it does indeed work, once I downloaded the 2009 version.
Other comments, for what they’re worth:
Thus far, I have found one file that Super fails to convert from FLV to AVI, though FFMpeg does. Note that the viewer within Super plays the file fine.
I normally get to the command prompt this way:
Win 95/98:
Click on Start, Run, type “COMMAND” (without the quotes), hit the “Enter” key or click “OK”.
Win 2000 or higher:
Click on Start, Run, type “cmd” (without the quotes), hit the “Enter” key, or click “OK”.
I find this is often easier than hunting for the command prompt icon in the start menu.
Spaces between words have a special function in DOS. Therefore, if you have a folder or file that contains an embedded space, you should surrounded the text with double quotes in order to be certain it is processed correctly:
ffmpeg -i “Test file.flv” “Test file.avi”
works as expected, however:
ffmpeg -i Test file.flv Test file.avi
does not.
Another thing to keep in mind, is that DOS utilities are usually very picky about the way the information is provided to them. The order in which the information is entered is as important as using the exact command syntax.
Therefore:
ffmpeg -i football.flv football.avi
is not the same as:
ffmpg -i football.flv football.avi
(Reason – command “FFMpeg” is not spelled correctly)
Also:
ffmpg -i football.flv football.avi
is not the same as:
ffmpeg -i football.avi football.flv
(Reason – Input and output file names are reversed)
Also:
ffmpeg -i football.flv football.avi
may not be the same as:
ffmpeg -I football.flv football.avi
(Reason: the letter ‘I’ is capitalized)
and also not the same as
ffmpeg i football.flv football.avi
(Reason the ‘-‘ before the letter ‘i’ is missing)
It is very easy to overlook these things.
Incredible! Incredibly easy! I was able to convert a Real Player Video file to wmv in just seconds. Worked like a champ. Thanks for making this possible.
Thanks a lot. This is cool!. I was looking to convert other video formats to .flv through a php script.
If anyone is about to do the same thing,something like this would work…
(I have my ffmpeg.exe in d:/easy_ffmpeg/ )
exec(“d:/easy_ffmpeg/ffmpeg -i srcfile.wmv outputfile.flv”);
Tried it with a camrec file. It doesn’t work. I am so frustrated. I have a a very personal and important video to convert. I dont want to pay almost $300.00 to open one file.
ALX- Sorry, don’t know anything about Camrec and Camtasia file conversion
Hello and thanks for this product/tutorial! I am wondering if it is possible to convert AUDIO ONLY flv files into a playable Media Player or iPod format? Also, I am unable to get a picture when I convert from flv to wmv and open in Windows Media Player, only sound. Any suggestions? What I ended up doing is converting to avi and using MediaCoder to convert to H.264 (since I ultimately want the video on my iPod). But I’d also like the option to play it on my pc. Any help is greatly appreciated!!
Thanks again!
When I tried to use this to convert a .flv video to .wmv video I came up with an error!
Does it matter that it is a flash video?
Could not find codec parameters
Seems stream 0 codec frame rate differs from container frame rate: 1000.000 ->
Please Help.
Thanks
ALX – Haven’t seen this one before. Seems like a flaky FLV file.
Hey man, You are great. Thanks a lot for the stuff. This works perfectly. I was looking for something like this.
Very good! A few teething problems but I hadn’t read the instructions corectly! My constant problem! Looking forward to exploring further.
Since I’ve installed ffmpeg and found there is no sound when importing the video into a video editing software, what I do is from a FLV player record the sound with a “record what “u” hear” device and then import both the wav and video, then sync them up and the video has sound! And can be edited. No doubt there is a package out there that will do the job, but what the hell I thought!
I’m getting that “Could not find video grab device” too. Have you got a solution yet? Thanks in advance.
Thanks guys that was extremely helpful!
sandeep verma
(http://sandeepverma.wordpress.com)
I’d hoped this would let me do my own conversions to FLV, so I wouldn’t be prisoner to Youtube’s 10 minute limit. But anyway, I tried converting a 10 minute FV format avi file (the best my edit software could put out) to FLV. At first it just complained about the sample rate, so I specified that as your instructions suggested. It seemed to get a little further then, but it gave up after complaining of an error opening codec for the output stream. I thought, having installed the latest FLASH on my system that all the FLV codecs would be in place. But maybe not?
For converting to a default format usable for writing to DVD, use the
-target dvd or -target ntsc-dvd or -target pal-dvd switches.
Examples:
ffmpeg -i samplevideo.flv -target ntsc-dvd samplevideo.mpg
Then you can use your favorite burning software to burn the converted file to DVD for playable in any DVD player.
Note that the default NTSC screen size is 720 x 480, which will degrade resolution if you are upsizing from a smaller sized flv video (which is often 416 x 324 (or even 360×240).
You are a ROCK STAR DUDE!!! It worked exactly like you said it would. I have AVS converter and for some reason when I tried to convert a .flv file, I got video with no audio. With your help, I got both!
Thanks buddy! I appreciate it!
PROPELLER HEADS UNITE!
I LOVE U!!!! I was about to go and buy FLV converter software and decided to take one more look on the net and found your post. Whew hoo! Thank you for the explicit details for a tech dummy like myself
My flv file I want to conert to wmv, it’s info is:
6.88 mb, really don’t see any other info, in it’s file tap properties than that. Windows media player isn’t/can’t play (ing) it. For myself, personally, I find little video file’s online I’d like to have in my video’s folder on my computer, but when the file’s are in other player’s, with different file’s extension’s, plus site’s don’t allow download without $$$. Forget that. And I only choose to use One video player and that is WMP 10, not 11, 10, that it’s, period. Thank you in advance.
:: A simple bat file that I found useful
:: save it with ffmpeg and drop flv(etc) files onto it
%~d0
cd %~p0
ffmpeg -i “%1” -b 500000 “%~dpn1.wmv”
pause
:: Steve
Nice job. I had a Youtube vid I wanted to convert, and I’m old enough to have used DOS, so the command line wasn’t a problem. Super kept giving me errors, and the first zip I downloaded from you didn’t work right on it, but everything worked perfectly when I used the 2009 zip.
Thanks very much.
Thanks a lot!
First time it didn’t work for me cuz my file name had a space in it,took the space out & it worked like a charm!
I have rarely operated from the command prompt/DOS, so I wasn’t too intimidated!
My dad is more of a “propellerhead”; he would be proud! 😉
Mad props to you!
HOW CAN I DOWNLOAD WITH FLV
Thanks, it worked for me where others failed to give me sound.
I can’t believe it took me so much effort to find a tutorial that told me very clearly what I needed to know — how to convert TO flv format from another one!
ffmpeg -i InputFile.mpg -ar 22050 OutputFile.flv
I’d have thought the ffmepg brilliant developers might get that there are those of us who want to upload and stream files, not just download them to convert to other formats… But, it seems they don’t.
Anyway… THANK YOU!!!
I used the original Ffmep and it worked great! I felt smart after my first successful attempt. then I ran into problems with “codec not supported” and tried the 2009 version. I was then able to convert the files I couldn’t before, but when I tried to play the files in WMPlayer it says they are corrupted.
Just to test it, I converted my first successful conversion with the 2009 version and it resulted in a corrupted file as well. Is there any way to fix the corruption, or something different I should enter in the directory to convert using the 2009 version?
ALX – Can anyone offer Boyd any help?
How do you write, for instance, football.avi, if it’s in a folder in My Documents, so the FFMpeg program can find track and find it?
ALX – Hi Mimi. If you had football.avi in a folder within My Documents (we will call the folder ‘somefolder’), and assuming you wanted to convert it to an FLV file, you could use…
ffmpeg -i somefolder\football.avi football.flv
flv @ 00931554 Unsupported video codec (7)
Is there a way to get the right video codec?
The file is a FLV from YouTube
It works great :-> Thank u v much.
Mimi –
I also had “Unsupported video codec (7)” error. But then I downloaded the 2009 version and it worked perfectly.
Tim –
If the converted file does not play on WMPlayer generating corrupted file error, please try VLC Media Player (it is free).
My objective is to download YouTube vidoes, select a certain part of the clip and then create an mpg file. I cannot get it to work. This is what I have done.
1. Download the youtube I want creating an flv file. I am currently using the ImToo downloader. It appears to download with no errors and it plays perfectly, both video and audio with VLC Media Player.
2. I then convert it with the latest version of ffmpeg which produces an mpg file that is playable with either MS Media Player or VLC Media Player. Both video and audio are just fine.
3. I then load the mpg file produced with ffmpeg into Pinnacle STudio 11 (latest patched version) for editing but get no audio.
4. I also loaded the produced mpg file into Sony Vegas 6.0 and the audio track does not show up in the timeline.
Can anyone shed some light on this?
Any help greatly appreciated as I am trying to put together some clips out of YouTube to produce a DVD for the local veterans home at which I am a veteran volunteer.
Henry
Henry, an all too common problem with the mess that is video and audio standards on computers. The trick will be in the conversion part to choose a different audio setting or possibly audio sampling bit rate. There are comments elsewhere in this thread that mention this I think. Bear in mind that the video and audio parts are basically separate within whatever wrapper file format you are using – FLV or MPG. You can convert each using different options. If you get an option to use MP3 audio, that’s always a safe bet. I avoid VBR (variable bit rate MP3’s for compatibility reasons). Hope these tips help.
Hi,
I need to know how can I convert the video files such as 3gp. wmv, rm. mov, mpg, mpg4 to flv on runtime. and also like to know good hosting service company names and how can I used their service.
Early Response is highly appreciated
Hey, can’t thank you enough!
I’m certainly no – as you put it – propeller-head, but it worked great for me!
As soon as I clued that whatever default directory command opens up in is the directory in which all the files should go it was seamless.
Great program!
Can you cut(shorten) .flv files without converting to another extension using ffmpeg if you know the frame?
Couldn’t be written any better. Reading this post reminds me of my old room mate! He always kept talking about this. I will forward this article to him. Pretty sure he will have a good read. Thanks for sharing!
I love this method, but it’s been ages since I’ve written a bath file, so I ask you: What would be the best way to create a batch file to automatically convert multiple FLVs dropped into their default download folder? (I’m assuming I’d have to use a scheduler, which is fine).
I didn’t retain the know-how needed to maintain the original name (i.e. “helicopter stunt.flv” becames “helicopter stunt.avi” along with various other titles retaining their format via the automated script). Anyone who still is fluent in batch, could you whip up an example here?
If you have tips or commands I’d be forever grateful.
Unrelated tie in:
Another command line tool I can’t live without is unrar for dos (makers of winrar) which reallly comes in handy for unRARing masses of RAR files. Reminds me of the BBS days.
Thank a lot!!! really good article.
But it works only on my local machine and when I upload my website on server the ffmpeg function is not working.
I dont know what is the reason!!!
it may related to path or something else. please help me on this.
I use
exec(‘ffmpeg -i atlantise.mp4 atlantise.wmv’);
very interesting info that confirmed what i suspected about flv conversion software and big companies… unfortunately the link for more info on the command ffmpeg was not found…perhaps due to pressure from others…it’s too bad our world is so capitalistically driven…koodoos to u alx keep up ur good work:)
Nicely written. Well done. I’m so tired of moronic copyright issues with video formats. Seriously, retarded. Thanks for the great overview of ffmpeg.
You are a saint! That tip regarding the sampling rate for audio output (i.e. use 22050) rescued me from FLV conversion despair. I’m going to make a donation to your Donation Page as a token of my appreciation. Thank you so much!
How can I convert MOD and MTS file to FLV using fmpeg?
Is there any other plugins to be added?
I have tried like this, but didn’t work.
for MOD:
ffmpeg -i test1.MOD -f avi -r 29.97 -b 6000kb -mbd 2 -aic 3 -cmp 2 -subcmp 2 -an – g 4 -vcodec xvid test1.FLV”
for MTS:
ffmpeg -i test2.MTS -vcodec flv -f flv -r 25 -s 800×450 -aspect 16:9 \ -b 2000k -g 160 -cmp 2 -subcmp 2 -mbd 2 -flags +aic+cbp+mv0+mv4 \ -trellis 2 -acodec libmp3lame -ac 2 -ar 44100 -ab 256k \ test2.FLV”
Anybody can help me…? Thanks in advance.
Thanks
This software works great. And real easy if you know a little DOS, thanks Billy G.
All other “free” GUI software is just a hoax. First you download some setup program then that program is supposed to download the actual file. They just want to install browser, search and other stuff to your pc.
Once again thanks for the, how to. Five stars.
Digital Media Converter is an excellent free audio video converter. The GUI is much easier to use.
Hiya.
I know this post is from a long time ago, so I might have missed the boat.
The link “Download the new 2009 version here.” is just timing out for me. Similarly, the “Windows FFmpeg pack ” link.
The link to http://ffmpeg.mplayerhq.hu/ offered a download, but it doesn’t contain .exe file, instead needing a configuration install – or something – which is a bit beyond my knowledge.
Also tried a link to http://ffmpeg.zeranoe.com/builds/ and tried several times, but couldn’t download the file (.7z type). It may be just as complex as the other download.
I’m a little out of my depth, perhaps.
Any chance of uploading the easy-to-use ffmpeg pack again? I read through the post and it seems straightforward.
cheers
Gracias por tu valiosa informacion, me ha servido mucho. Saludos desde Venezuela.