In a previous article I showed how to easily fix an overheating Dell laptop. From the comments I’ve received it seems to have helped a lot of people, so when my wife’s Acer laptop started acting in a strange way, rebooting for no reason, loud fan noises, severe burning of the legs – I sensed it might be an overheating problem again, and a new Layman’s Guide beckoned…
This time I wanted to make it more general, and applicable to almost any laptop that might be having overheating trouble.
If you have a laptop (or any computer for that matter) that is constantly restarting or rebooting for no apparent reason, the reason may well be overheating. If your computer is constantly rebooting and there are other tell-tale signs… such as the fan coming on more often than you remember, and sounding louder… very hot air coming out of the side vent… you almost certainly have an overheating problem.
The good news is that it can be fixed by yourself, typically in under 5 minutes. No incorrectly diagnosed (and very expensive) motherboard upgrades are needed. All you need is a screwdriver and a vacuum cleaner. You might even get away without the vacuum cleaner…
Much like vacuum cleaners, a laptop switches itself off if it gets too hot. This is to protect the valuable brain of the computer, its main processor or CPU, as well as our precious legs. Also similar to other things that overheat, the problem is often caused by excessive fluff build up in an important area.
On a laptop this crucial area is the fan that sucks air across the CPU to keep it cool. This point is important… inside a computer a fan is used to suck air across the CPU (which heats up).
After about a year or two of use, many laptops build up layers of fluff in the fan area that are thick enough to stop the flow of air. This means the CPU is not being cooled properly, it overheats, and the safety mechanism kicks in and shuts the computer down. You experience it as a reboot. (There is a mini temperature sensor built onto the main chip itself that constantly monitors its temperature)
To be absolutely sure you have the problem I describe, ask yourself this question… After your computer has been off for a long time (i.e. cooled down), and is switched back on again, does it last longer than usual before shutting down? You could, if you’re brave, cool it in a fridge to speed this up.
If the answers to this questions is yes, you absolutely have an overheating laptop, causing your reboot problem.
As an overview, what we are going to do is find the place where the fluff is building up inside the computer and remove it. This should fix the computer instantly with no further action required.
Turn your laptop over and look at its base. Somewhere there will be a panel that you can remove with a few screws, that gives you access to the main processor and fan. Most likely there will be several panels you can remove with a few screws – but don’t worry – I’ll help you find the right one.
Incidentally, not every laptop allows access to its main processor and fan (Apple laptops typically don’t). Some use other mechanisms besides screws e.g. catches, latches etc.
Before you start removing screws randomly, and assuming any descriptive icons present are undecipherable, there is something you can do to zero in on the right panel.
Turn on your computer, wait for the fan to come on, and work out where the hot air is blowing out. Normally the panel you seek is close to this. If you can’t hear a fan, you may have a broken fan – this would also cause the same over-heating problem described, but is trickier to fix – you’ll need a replacement fan unit basically – these can typically be ordered online.
If the fan is simply stuck, eg with fluff, the instructions below will help.
I’ll show you how the panel and fan looks on an Acer laptop (an Aspire 3003LM ZL5 to be precise) and this will show you what to look for on your own machine.
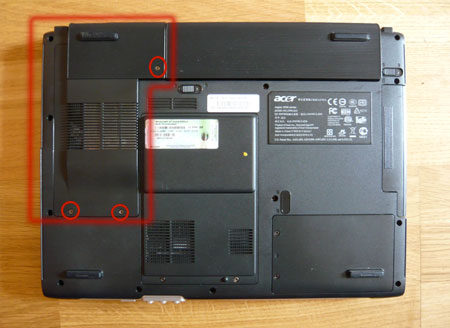
On our Acer laptop, the panel we’re interested in is at the top left of the laptop when you are looking at the underside (labels reading correct-way-up). I found it by feeling around for the scalding hot air coming out of that corner.
3 screws hold the panel in place as shown…
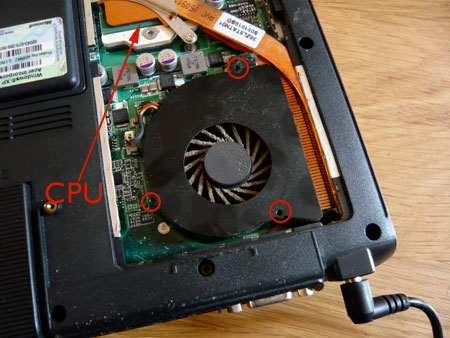
With the screws removed and panel lifted off, you can see the fan which cools the CPU (via a bronze air tunnel). I’ve turned the machine around 180 degrees for this photo. Different laptops have different configurations, they might not have air tunnels for instance, but the basic principle of sucking or blowing air across the CPU remains. On this laptop, the fan is enclosed in its own mini-housing with 3 screws holding down the top cover. These 3 screw locations are circled.
You really don’t need to worry about which bit is which however, simply look for fluff build-up around the fan and in any areas that could be ‘airflow areas’. A common area for fluff build-up is the inside of the vent which takes the hot air outside. You can see this on our laptop below.
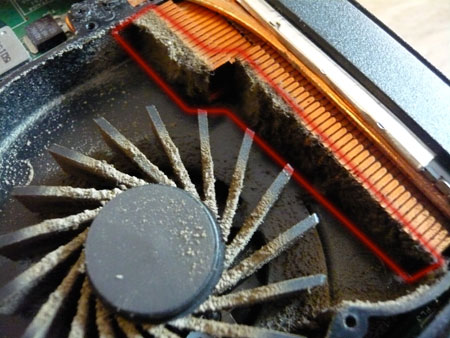
Using common-sense, prise, suck or blow away any ‘fluff blankets’ that are restricting the air flow. Sometimes these fluff blankets are so compacted, and come away so uniformly, that you think they are supposed to be there as some kind of… insulation – they are not! (You can see one near the top of the photo above – encircled in red).
If you use a vacuum cleaner and suitable attachment, you can have a great deal of fun ‘sucking on one side of the fan and making it spin round’ very quickly. You’re unlikely to do any harm.
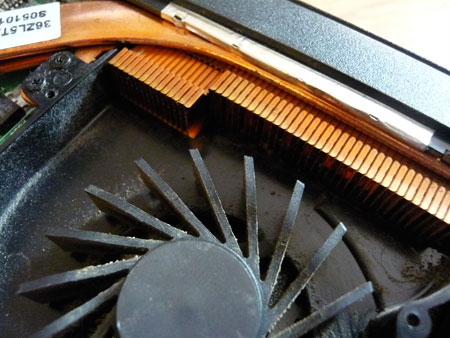
With fluff removed, your fan area should now look a lot cleaner, and clearer. Spot the difference below…
If you’ve successfully and with due pride… pulled away a compacted blanket of fluff, you can now feel pretty chipper… You can announce to family or dog ‘I think I’ve fixed it’… and carefully replace the bits and screws before turning on the computer to test it. You’re done basically, come back and check out the rest of my site please another time!
If you’ve hit a roadblock… for example fluff you can’t access because it is hidden behind something important looking, use your common sense and evaluate your own skills. Removing the CPU, fan or heatsink for example can be tricky and can lead to bits breaking, although these components are among the cheaper and easier things to replace. You must make the call.
If you have experiences to share, love to give, or other musings, please leave your comments below. This has been one of a growing series of Layman’s Guides, written as I come across problems I need to solve. They now include…
Fixing an overheating Dell Inspiron laptop
What is RSS? And why do I care?
Converting FLV video – A Layman’s Guide
A Review and Guide to CamTwist Video Software
Syncing a Blackberry Pearl with the Mac Address Book
How to get David Letterman tickets
Accessing MovieLink and CinemaNow from outside the USA
An overview of the current InternetTV landscape
Glossary of Online Video terms
A Layman’s Guide to the UDRP
Brilliant thanks, worked perfectly and my laptop no longer sounds like an aircraft taking off!
nice. very layman-ish
is it possible for you to make for an HP laptop? I tried opening it but I could not find the fan at all… I think they built the way they can only fix… thanks btw to this guide there is hope to fix my overheating laptop!
Without opening the back to my Acer Extensa, I simply put a vacuum cleaner nozzle to the underside vent and saw a large clump of gray dust get sucked through… She’s running cool now! Thanks for your help.
Brilliant, thank you. Now I can fix my wifes laptop. Now I just need to figure out how to disasemble my HP Dv 9000…any hintS?
Thank you so much Alx. You saved me a lot of money. I had this problem with a Dell studio laptop that was out of warranty. I called Dell and they asked me to pay $48 for a diagnostic test plus any required parts or to pay a $159 to extend the warranty!!!
I avoided all that by just cleaning the fan!!! Before I read your article I thought that there might be a problem with the fan but I never imagined that I will find all that amount of fluff in it since I had this laptop for a year and half only.
Thank you! My fan looked almost exactly like your picture (mine’s an Acer Aspire 5000). I too like the tiny klaxon noises you can get by spinning the fan up with a vacuum cleaner – but it produces zillions of electron volts – I guess that’s why you left the power lead in . . .
I’m not so keen on the ‘suck it out through the fins’ approach – for one, it doesn’t clean the fan blades properly, for two, it will certainly jam some of the fluff semi-permanently onto the surfaces of the fins, thus giving your laptop a 99% certainty of relapsing into dust-cancer pretty damn quick.
BTW, I guess this annoying fluff is a boon to forensic scientists when they want to find out who’s been using a computer and where – almost like tree rings, it contain layers of dead skin cells, carpet fibre, pollen, food detritus, that must put many a felon behind bars . . .
Cheers, Mark
I also cleaned each blade of the fan with a cotton bud – my theory is that if you remove that last layer of adhered nano-particles, it’ll take longer for the dust to start sticking again . . .
So pleased I found your site. I was so fed up of my laptop crashing, sometimes 4 or 5 times a night. I followed your instructions to the letter first thing this morning. A strange silence has descended!! I have to keep putting my ear to the laptop fan to make sure it is still working – and it is and it’s not hot.
You have saved me either replacing my laptop or taking it somewhere to get it fixed. I wouldn’t have had a clue where to start without your advice.
Many thanks.
Very useful guide, thanks. My wife’s computer’s performing far better now – it did seem as if it was on its last legs. They should put this in the manual that comes with the laptop! (although perhaps a laptop stopping working 6-12 months after a warrnty period isn’t too much of a problem for the manufacturer….)
hey guys.did you all got the computer back to work.my computer does not have sound or picture.is black .i will try to clean this at home and let you know tomorrow.
Thank You. Just had to clean out an overheating laptop and for the first time the pictures here matched exactly what I was working on (it was an Acer Aspire 3003WLMI model ZL5). The laptop, according to speedfan, was going to 69C just starting up. Went up in the high 90s just watching a Youtube video. Now it stays at a comfortable 50C-60c range. First time I’ve cleaned out a laptop from the inside. Thanks again.
Thanks Alx! I have a laptop that seems to have a noisy fan and I’m worried it’s going to quit and the thing will overheat.
Thanks Alx, This post was exactly what I needed to read AND see (pics were definitely helpful). Had an overheating problem but this resolved that. My son thought the ‘fluff blanket’ was indeed insulation but it was just a heavy, compacted sheet of dust. Thanks again. I really appreciate this!
Brilliant! You saved me a lot of money. I had this problem with a Dell studio laptop that was out of warranty. This is very helpful guide.
You, sir…are a lifesaver.
This is all well and good, but my aspire 5738 doesn’t have an access panel! I removed all the screws to try and get the entire base off, but when I did this it sounded like I was straining things that shouldn’t be strained. Bloody Acer!
i have a HP DV6 3049tx….
Have never done something like this by myself.
I knw am asking for too much but if possible Please help with picture walk through
THANK YOU SO MUCH! Like someone else said, my laptop sounded like an airplane taking off and worked so slow… I swear I vacuumed out an entire dog from the fan. Thank you thank you thank you!!!
Appreciate this suggestion as my three year old Acer 5732Z laptop had just unexpectedly shutdown this evening and was extremely hot. Following the recommendation I pulled out the vacuum cleaner and began trying to clear out the “fluff”. Only problem was that my model doesn’t have any screws over the fan compartment to remove and there was a large ball of “fluff” stuck behind the grill. Went and got one of the wife’s little tiny crochet hooks and picked it out between the grill slots quite handily. Thanks again for the tip.
I’m a novice but know that vacuums can generate static electricity. Wouldn’t this be a hazard with the circuit boards exposed? What precautions can be taken to avoid any static discharge in undesireable places?
The vacuum is sucking air – the simple flow of air will not create a static issue IMO.
Very useful information. This is really well guidance to fixing over heating problems in laptop. Thank you for sharing.
Mostly my laptop under overheating, but when you give the tips it’s very useful to me and solve the my problems Thank you
I was looking for solution of overheated issues. This blog helps me alot. Thanks for sharing.